Thursday, February 14, 2013

How to make earring studs.


I love Washi tape, y'all. It's a pretty cute thing out there. Back at my birthday party we bought washi tape to write on for the glass cups, making preassigned drink-ware. Long story short it didn't come for the party so now we have a roll sitting in our craftroom.  I used it.


Choose some washi tape and pick out two flat buttons.


Stick the button on the the tape.


Cut around the button.


Drop a spot of glue in the center and pour on some glitter. Let it dry (tip: it won't stay in a puffy round, the glue will flatten).


Use earring studs and hot-glue them to the back of the button. After it dries your earrings are ready to wear!


Tuesday, October 16, 2012

The tangled mess turned beautiful.


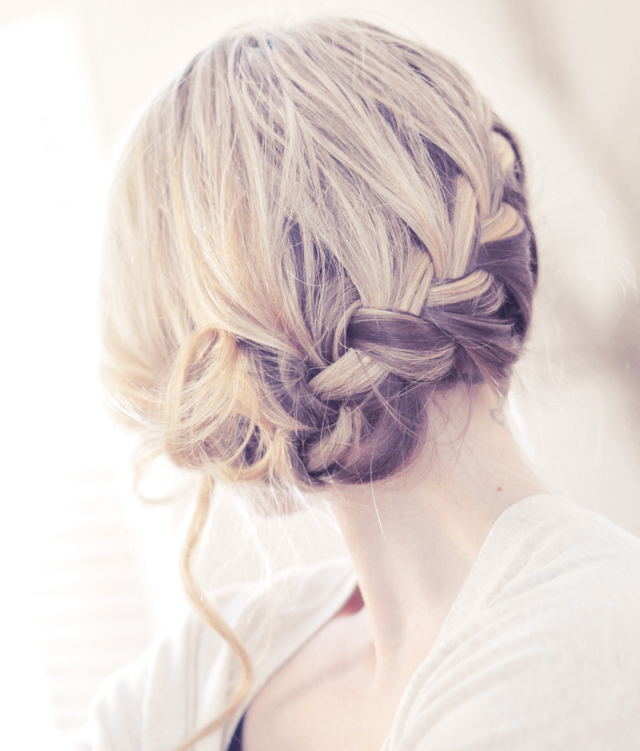
You stumble out of bed and wink open your eyes and see yourself in the mirror. Horrified, you clutch at the mop of hair that is laying in every direction but straight. You blink a couple times and wonder if you got struck by lightning, or the fairies, in a fit of mischief, knotted it up.  Then you give it up as lost, deal with it as best you can and hope no one looks too close.

Sadly, those days come too often  for my vanity. However, when you put on a touch of make-up and have enough time to do something with the "mop," you can walk out the door looking all right. In fact, pretty good. However, for those days when you are upset with your hair, have about zero time, but need to jerk it up with style for the day, I hope I bring you great news.
                                                   _ _ _ _ _ _ _ _ _ _ _                                 
Low French Braided Up-do
_ _ _ _ _ _ _ _ _ _ _
simple braid on the side or straight back, or add a twist with a fishtail braid (fishtails are very popular right now).

Tutorial: here.
_ _ _ _ _ _ _ _ _ _ _
_ _ _ _ _ _ _ _ _ _ _
_ _ _ _ _ _ _ _ _ _ _
_ _ _ _ _ _ _ _ _ _ _

There is hope! I am super excited about trying out these cute little up-dos! Play around.

Thursday, September 6, 2012

DIY Geometric Necklace


 I found some really fun geometric necklaces on craftgawker, but they were made out of paper/paint chips. I  kinda laughed at the idea because "Paper is way too flimsy to wear."  Right?  I kept seeing more and more of them being posted and then I finally decided "Why not try it?" (They were very cute.)  So I pulled out some paper, glue, and a little nail polish. Since I wasn't using paint chips, which naturally have a sheen, I painted on some clear nail polish. It not only gives it a shine, but protects the paper.


Very quick and super easy.


  1. Draw a "V" on the corner of a sheet of paper.  Make it 1/4" up, 1 1/8" across,  and  1 1/8" up, and   1/4" over. Cut on the line. Cut out three "V"s, each out of a different color.

  2.  Rub glue on the back of all three colors.  Place them down on a white sheet of paper, putting the bottom color down first and so on up.


3.   Cut around the outline.


4.   Brush on a light coat of clear nail polish.  Let it dry.  Poke one hole in the top of each corner.


Put a link of chain in each hole and then attach desired length of chain.

You are ready to wear it!

Saturday, September 1, 2012

DIY Striped Bag


When I was shopping in a store, here in Savannah, I found a bag that was SO cute, but a little over priced. When I got home I set myself to work recreating that same bag.  It was about the size of a cosmetic case with a wide shiny stripe at the bottom and a gold zipper. I didn't have shiny paint, but I did have fabric paint (which is all I needed).


I cut my fabric 10 inches by 13 inches, accounting for a 12 inch zipper and 1/2 inch seam allowances.


Place your fabric right sides together and sew along the bottom edge, just one seam.


Measure 3 inches on both sides of the center seam and mark. Place a strip of tape down and paint between the tape strips, let it dry a minute and then take up the tape. Leave it for a few hours and then sew up the two sides, right sides together.  Turn out bag.

If you want a lining, do the same as before, but with no paint.  You don't have to turn the lining inside out, just slip it down into the bag. Put in a 12" zipper (following the zipper instructions) and then you have finished the bag!

If you don't like the size of this bag, you can play around with measurements, just match it up to your zipper.


Have fun playing around!

Friday, April 13, 2012

How To Make A Skirt Without A Pattern

My new skirt!*


*On the blue-green skirt I added a darker blue fabric to the bottom for the hem.


I was getting the spring thrills. Excitement was egging me on to work faster and faster. I was so happy about this cute little skirt I was making...a summer skirt out of fabric I've been wanting to wear for years and I finally just made it.  My sister had a dress out of it when she was five and I wore it next.  It has memories.

When you find out how simple/easy/quick it is to make, you can turn them out like hotcakes.  It is really exciting!  I made this first skirt out of sail boats at a slower pace, but the next one only took me about three to four hours, start to finish.


I put a pocket in the second one. I just love pockets!

Making a skirt without a pattern is quite simple, believe it or not.  Really all you need is measurements and fabric.  I started thinking about how I could make a skirt without a pattern when I was making colonial petticoats for reenacting(they don't require patterns).  Simple. It turns out so cute.

So here's how to make a custom skirt that fits you (with photo tutorial):
You need fabric that is at least twice as wide as your waist measurement.
  1. Fold your fabric edge to edge and fold in half again making a long folded rectangle. Make sure it is even. 
  2. Measure your waist.  Write down that measurement. Measure from your waist to your desired length (mine was right above the knee). Add in the desired hem length  and seam allowance to the measurement.  Write that down.
  3. Cut off a large strip for the waist band ( I cut off 5 inches. When it was sewn onto the skirt it was a 2 inch waist band.)
  4. Measure down and cut the length that you found in step 2. (Don't forget the seam allowances and hem width!).
  5. Now you should have a large rectangle.  Sew the open side with right sides together, leaving about 6 inches at the top for placket. Flip to the right side.
  6. Pleat the top of the skirt.  I did a 2 inch box pleat in the front (and back) and worked out to the sides. Keep pleating until front and back each measure half the length of your waist (I have a 32 inch waist so the front was pleated 16 inches as was the back.  That was 8 inches a quarter).  The back pleat is best done inverted.  Don't get discouraged by the pleats.  They always take time to push and shove around.
  7. Lay your waist band strip right sides together with the pleated skirt, leaving a seam allowance sticking out past the selvage on the side back piece of the waistband and about an inch on the side front piece of the waistband.  Sew along the seam line at the top of the skirt. 
  8. Fold the long, unattached side of the waistband to the wrong side 1/4 inch and iron down.  Fold waistband with right sides together, sew along the short sides, and flip back to the right sides.  
  9. Handstitch the folded edge to the inside of the waistband..
  10. On the inside, fold the bottom up about 1/2-1/4 inch and then up again (I had a 4 inch hem). Sew along the top of the fold by hand or on the machine.  
  11. Here you can get creative.  For your placket you can put in a zipper, snaps, hooks, buttons, etc.  Have fun with it!
If this was at all confusing, feel free to ask questions and I will do my best to answer them. I am more than happy to help.  If you don't have a sewing machine, you can do it by hand.  Sewing isn't hard or intimidating.  Just go in and out :).  This would be a great first project! The pictures hopefully make things so much more clear.

Even out edge before cutting.

Measure.

Cut off the top few inches for a waist band.

Sew up the large skirt piece right sides together. 


Leave 6 inches (or so) for placket.


Center front pleat.


Stitch down the pleats so they don't move. (optional)

Measure to see if they are at the proper length.


Sew the waistband on right sides together with the skirt top.


Sew the waistband edge right sides together.

*Hem stitch down inside of waistband so the stitching is unseen on front. (You can top stitch it on the machine if you'd rather.)

Iron down hem. Sew. (I ran out of fabric so I needed to add a piece of white to give me a large hem.)


YAY! You made a skirt.  Don't you feel accomplished?  It is easy, and in a few hours you have a new skirt for your wardrobe.